Category Archives: Drone

Adding FPV to your Drone

Awhile back I shared that I had begun writing a column for Servo Magazine, beginning with building a drone from scratch. If you want to get a taste of the column, you can read the article "The Multi-Rotor Hobbyist - FlyFi: Weather Data Telemetry" for free!

This month I was lucky enough to have a cover feature on adding a camera and googles/screen to your drone setup. Adding this "First Person View" (FPV) capability really makes flying a lot different as its like you are setting in the cockpit!

Several years ago, I rode in the copilot’s seat of a small Cessna circling over northwest Arkansas. The view was great and the experience of sitting right behind the propeller with a view of where we were headed was fantastic. It made riding in economy of commercial airliners seem even more boring and cramped than it already did. As multirotor pilots, we can now have that experience with first person view (FPV) equipment that literally puts us in the pilot’s seat and immerses us in the experience of flying.

Be sure to checkout the column and let me know of other topics you'd be interested in seeing in future articles! Right now I've got a photogrammetry series coming up after a quick CX-10 hack.

Cheerson CX-10 Motor Repair

2016-06-07 19.53.32

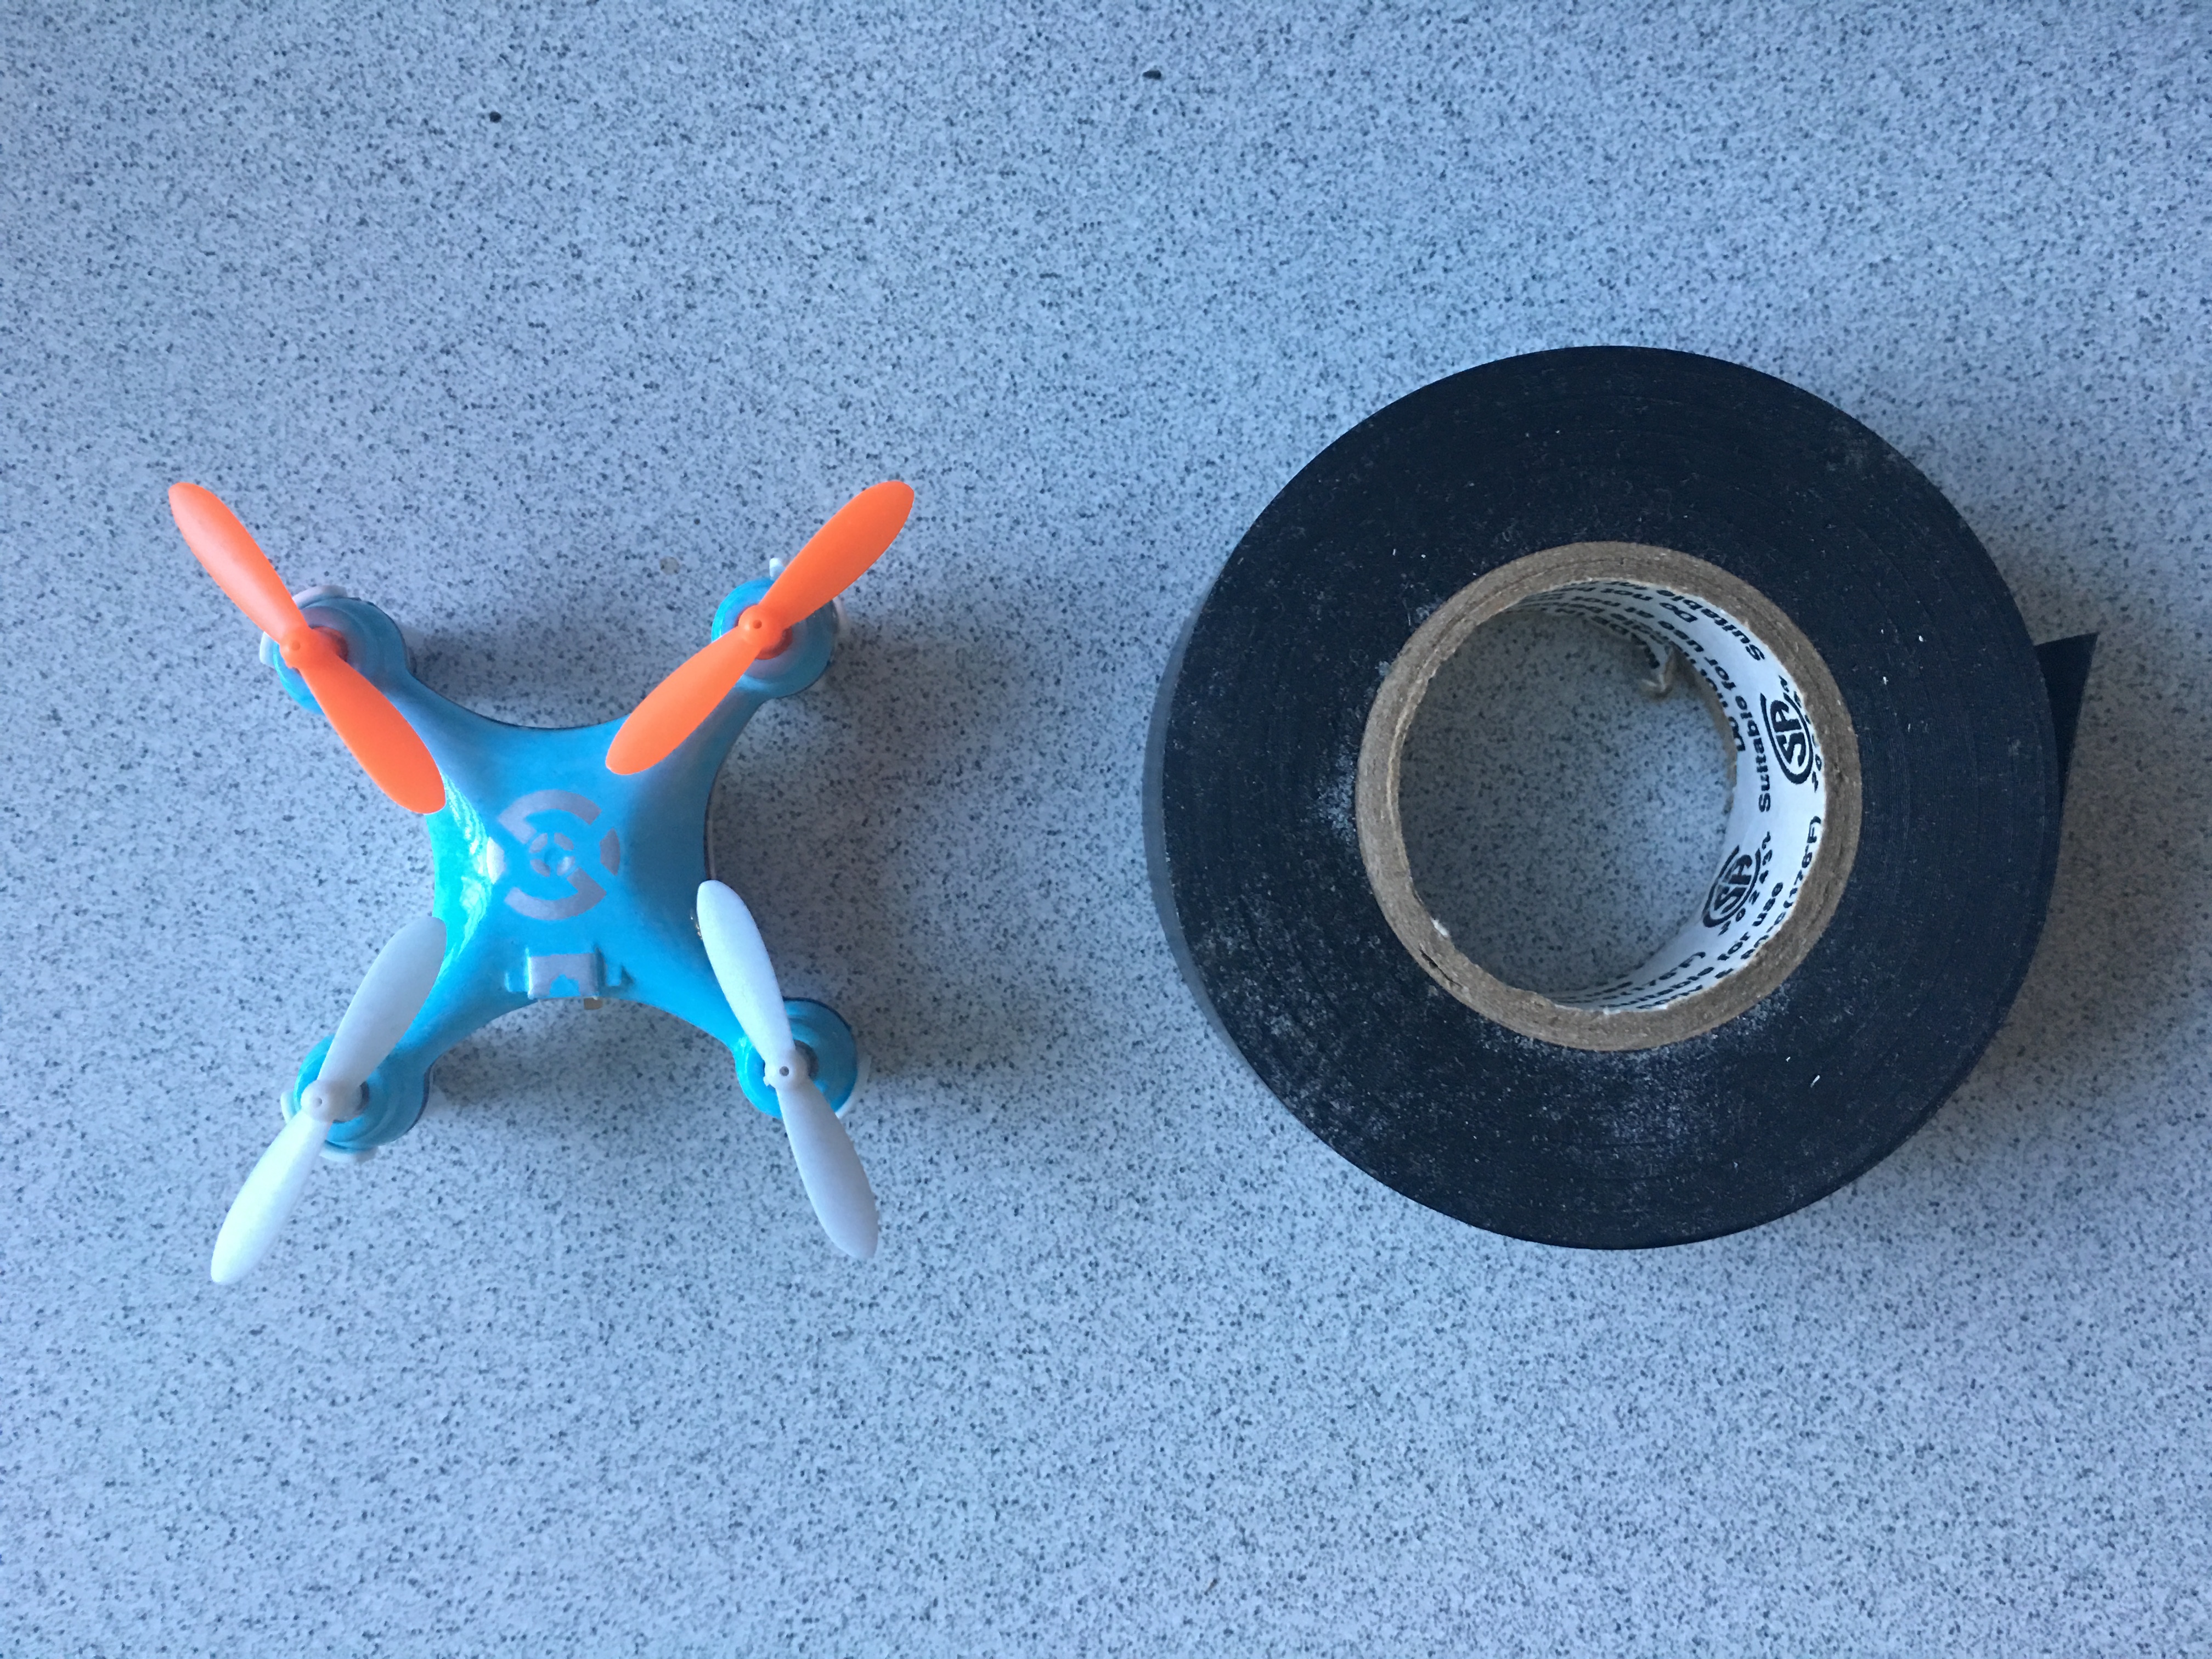
If you've been following my drone work through Servo or on social media, you have probably seen me posting pictures of the tiny Cheerson CX-10 quad. You can pick them up for ~$15 on Amazon and have hours of fun. As you can imagine, there is a fair share of crashing at first while getting used to the response of such a small vehicle. After a few run-ins with the wall, I could fly it pretty well though. I picked up a couple more, including a model with a camera. Amazing for the price. A couple of weeks ago there was some random falling out of the sky behavior, followed by the realization that one of the props on two of the three quads was not turning anymore. I checked for any hair/carpet wrapped on the shafts, but they were clean.

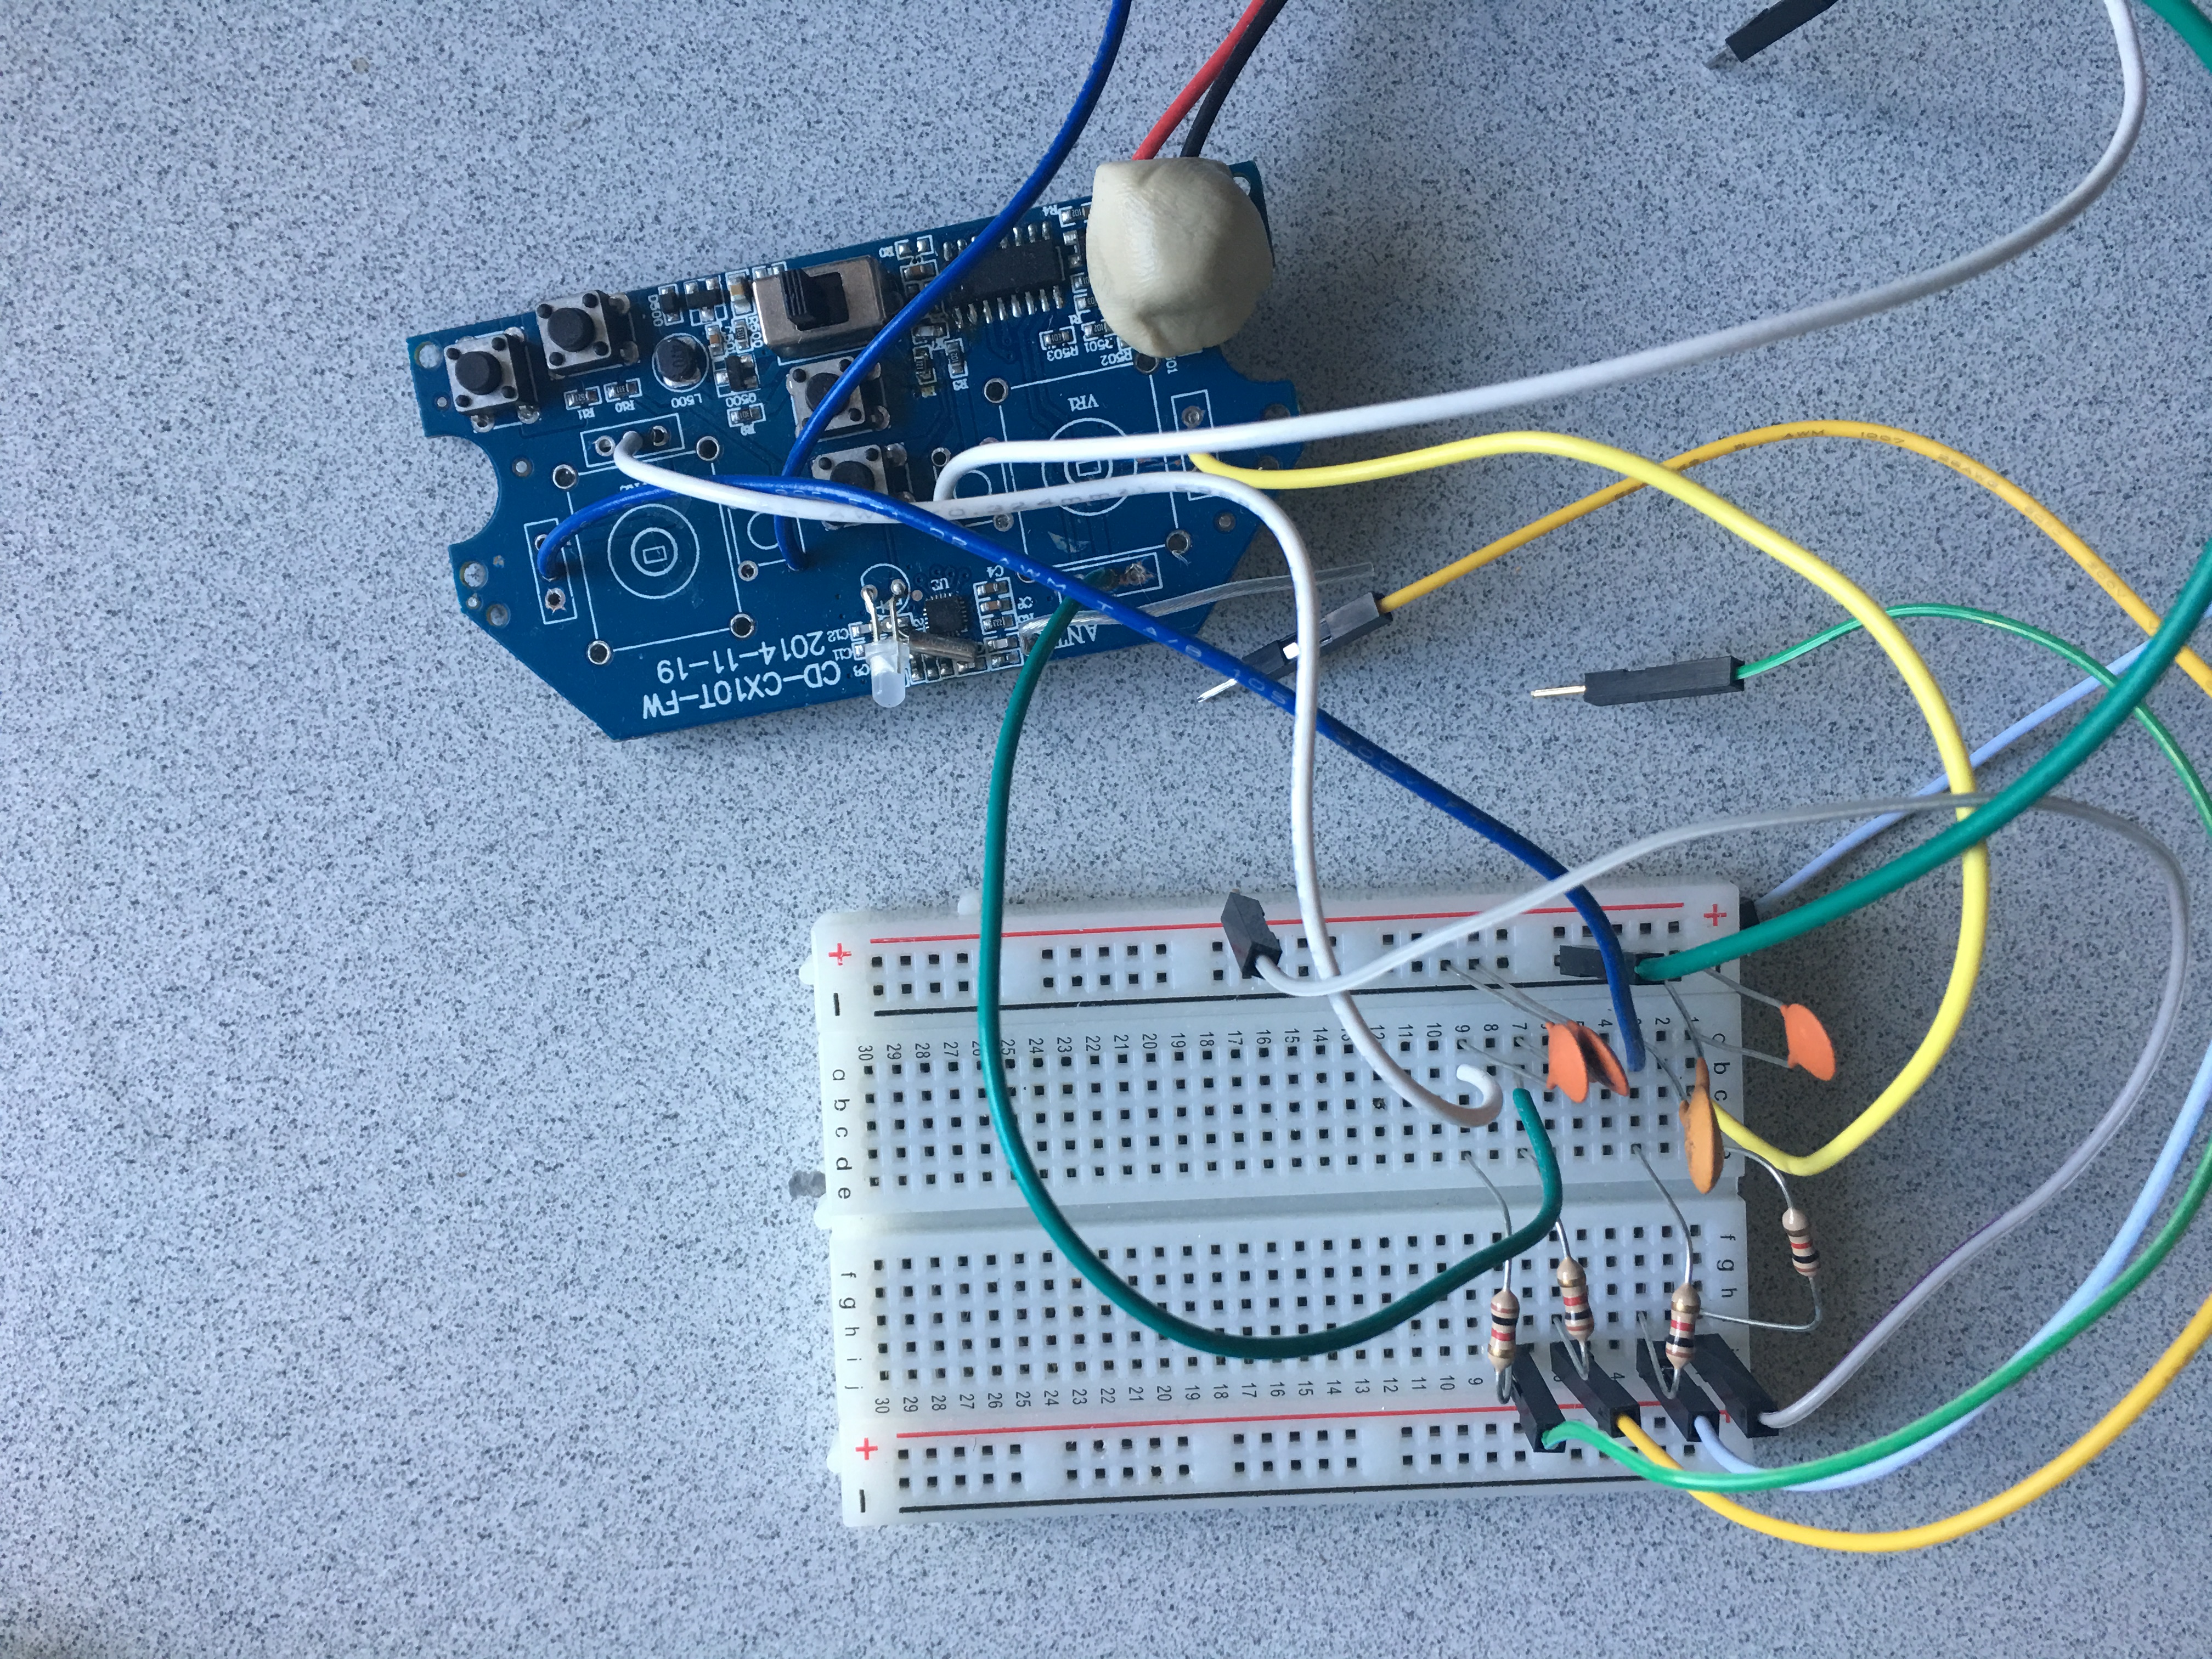
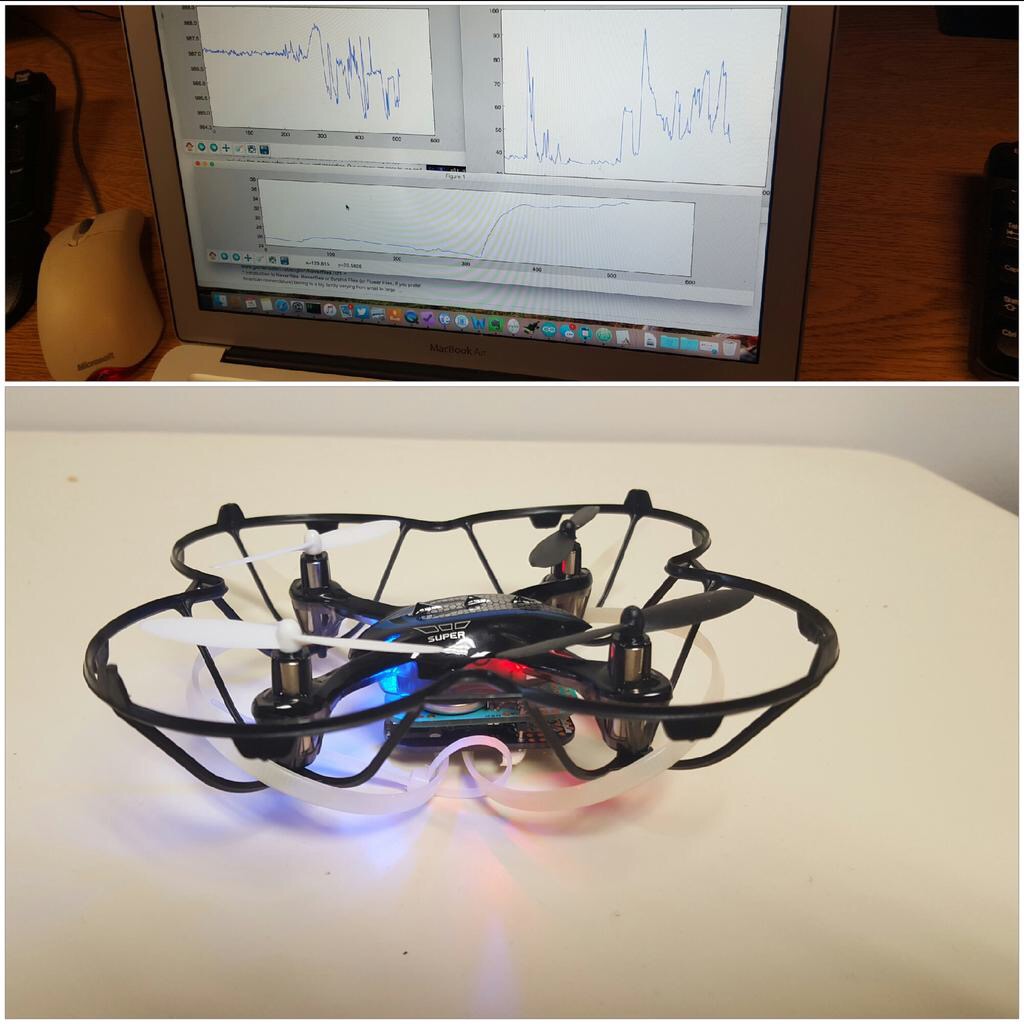
I needed to repair the quads as I'm working on a little project modifying their controller for a future Servo article (preview photo below). Sure, they are cheap enough that they are almost disposable, but I figure if nothing else I could swap some parts to get at least one working vehicle out of the two. Time to crack it open!

A teaser of a future project that I'll be writing up in Servo.

A teaser of a future project that I'll be writing up in Servo.

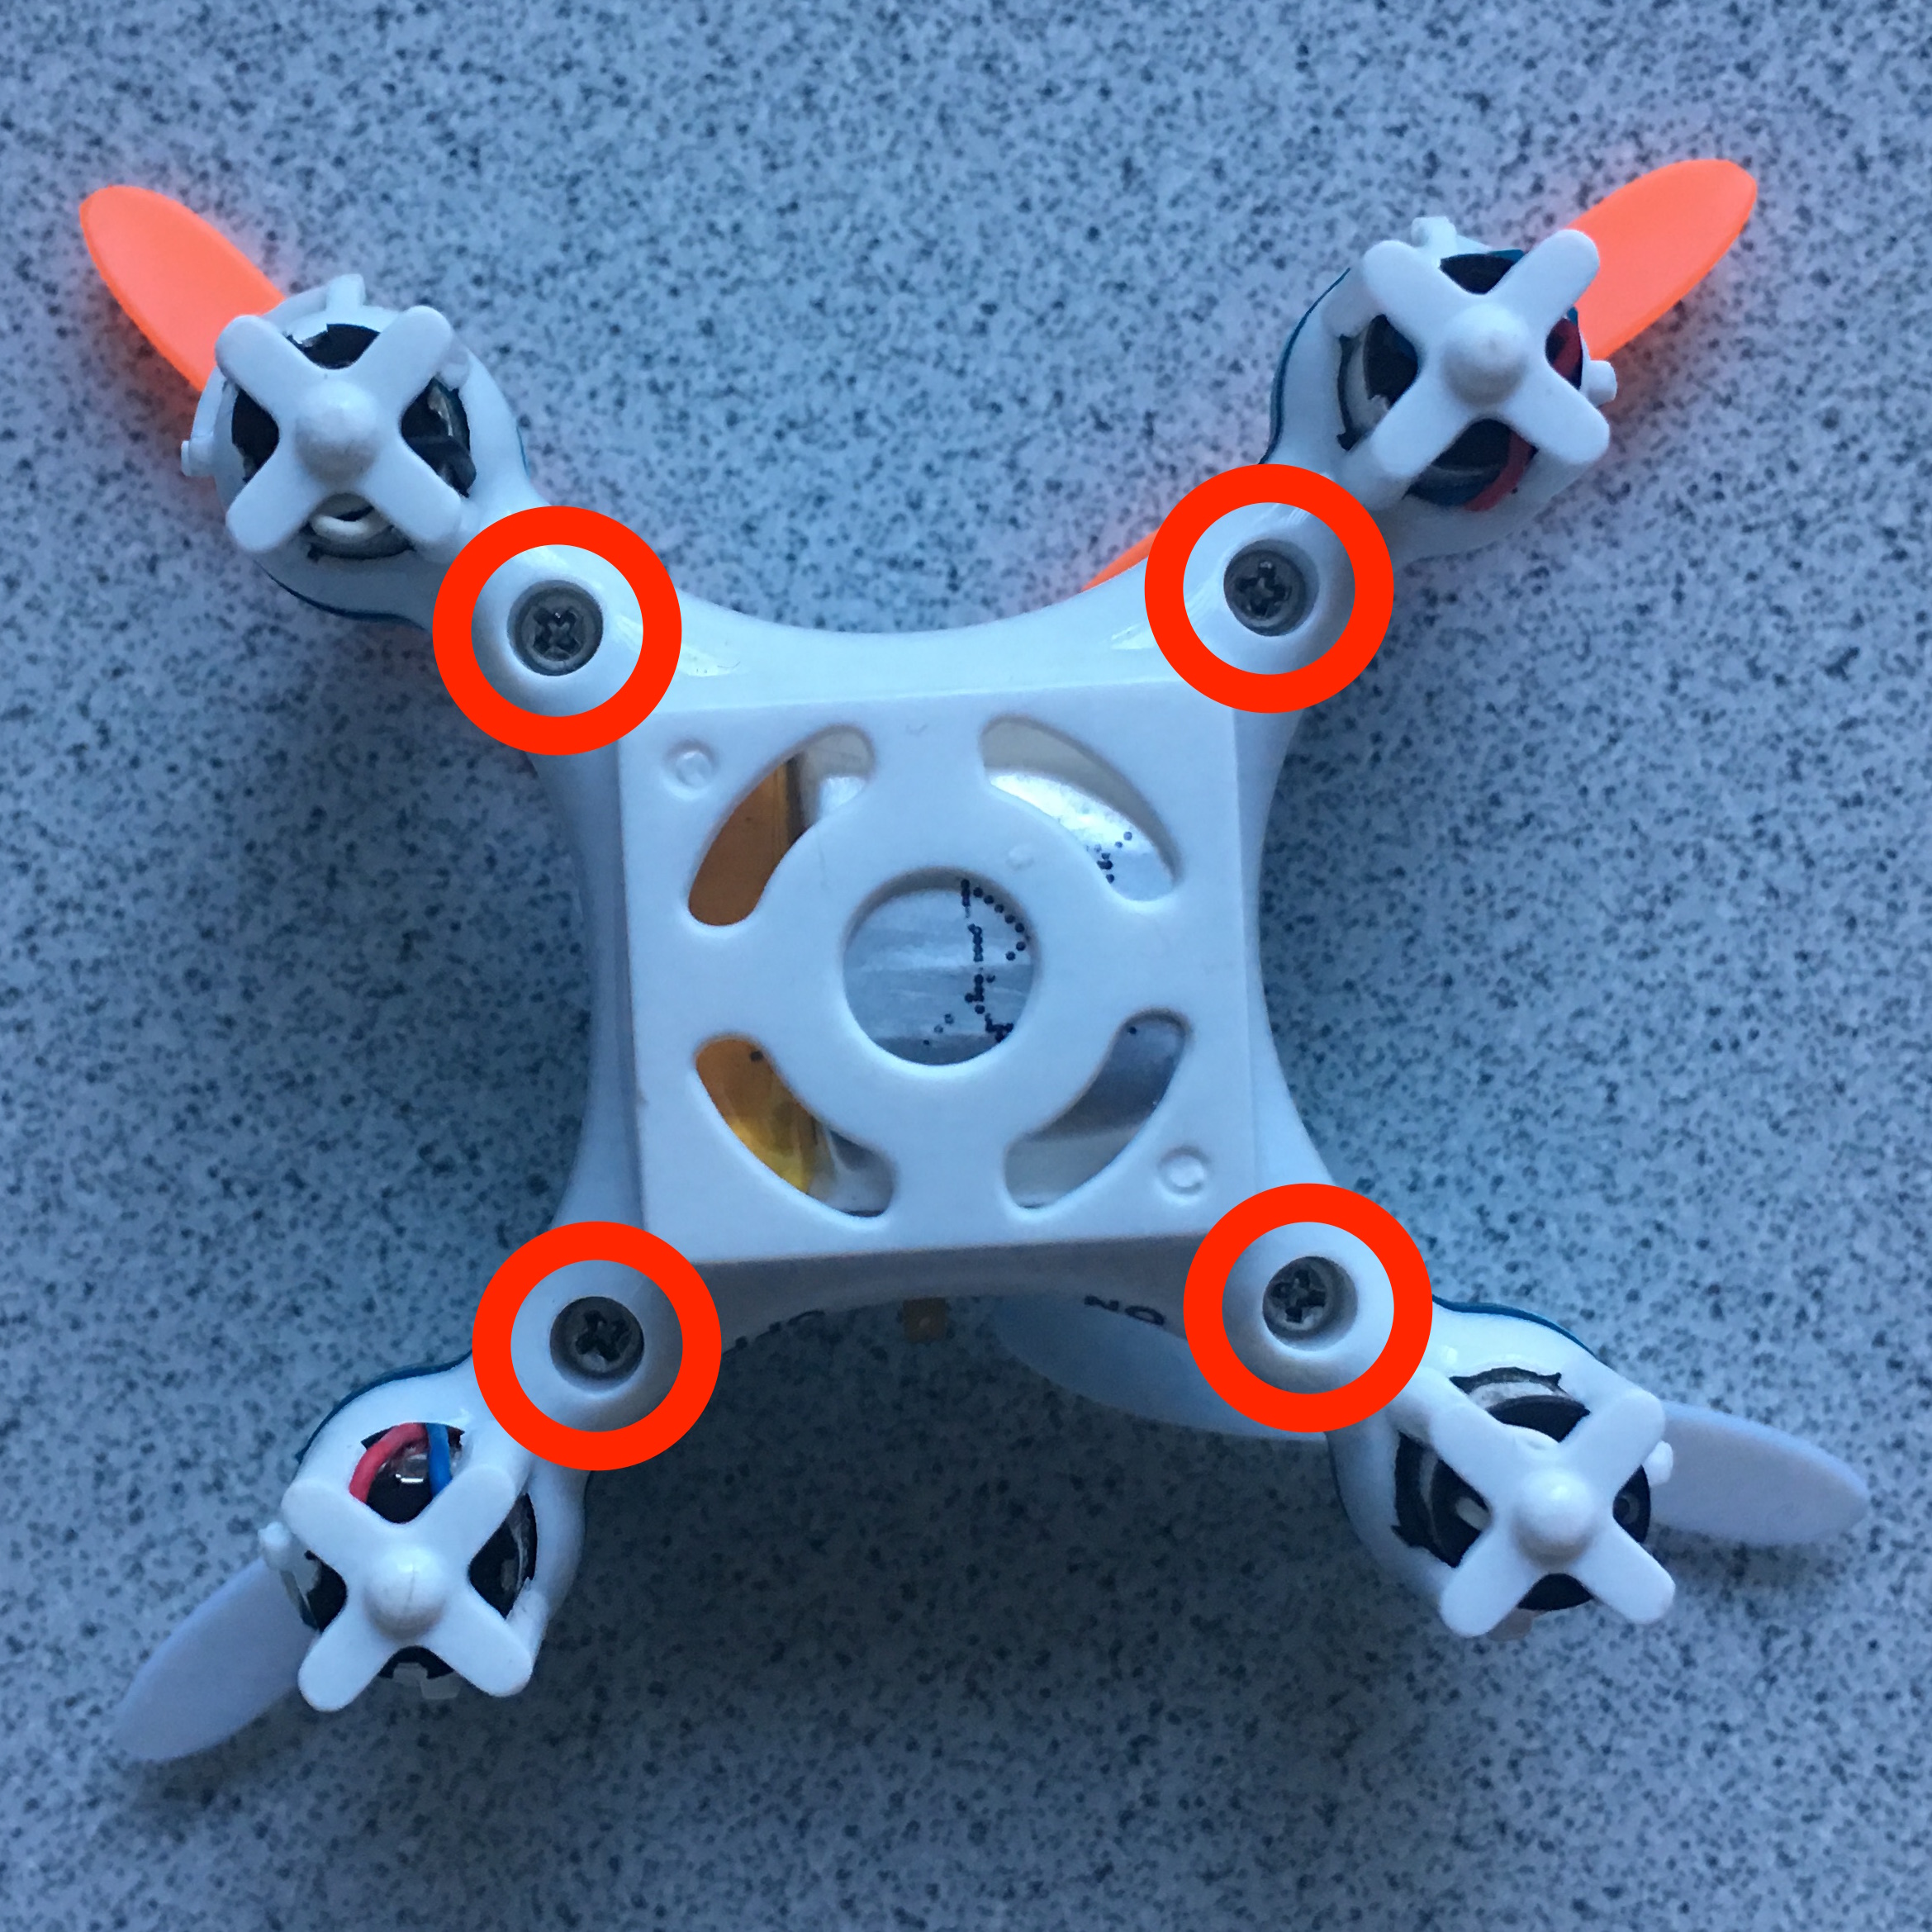
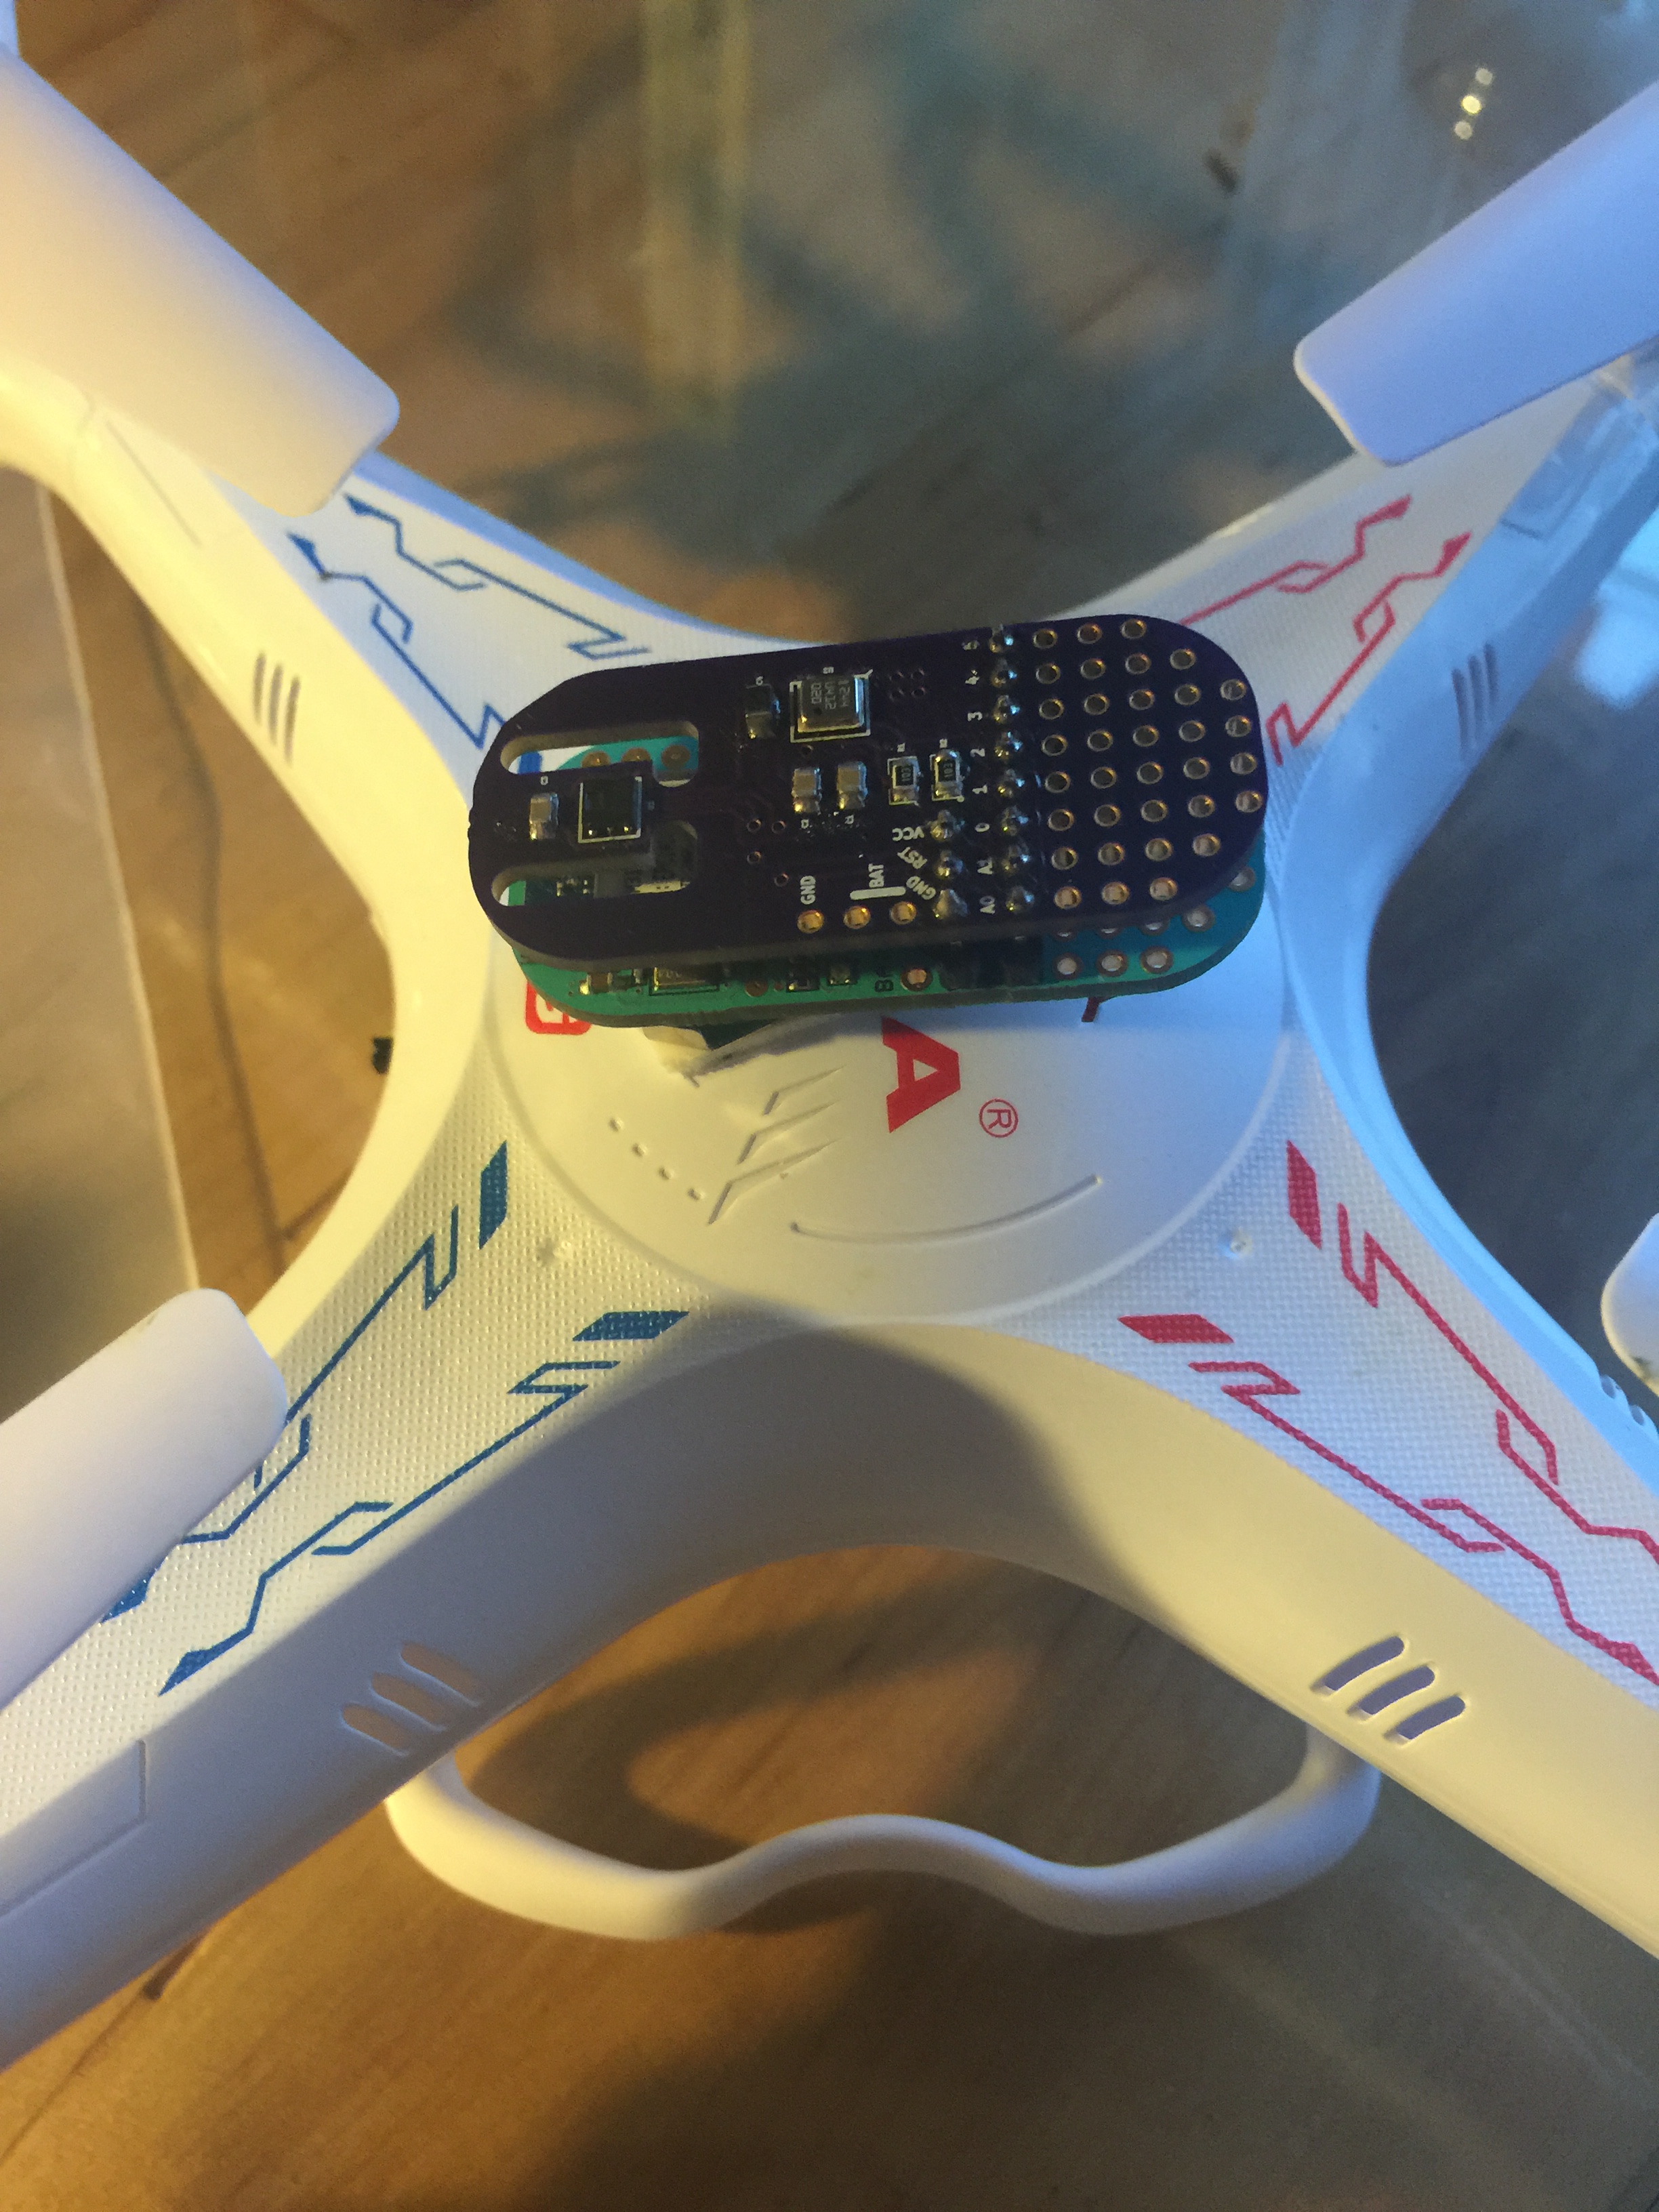
There are four small screws holding the plastic half-shells together. After removing those and placing them in a container for safe-keeping I gently pried open the plastic clips at the end of each motor extension arm. This was easy to do with just my fingernails. The two parts of the case came off and I was staring at the printed circuit board. (Side note: the camera is some module they just tacked on, so I just pushed it out of the way and ignored it.)

Four screws hold the airframe together. A jeweler's screwdriver set was essential!

Four screws hold the airframe together. A jeweler's screwdriver set was essential!

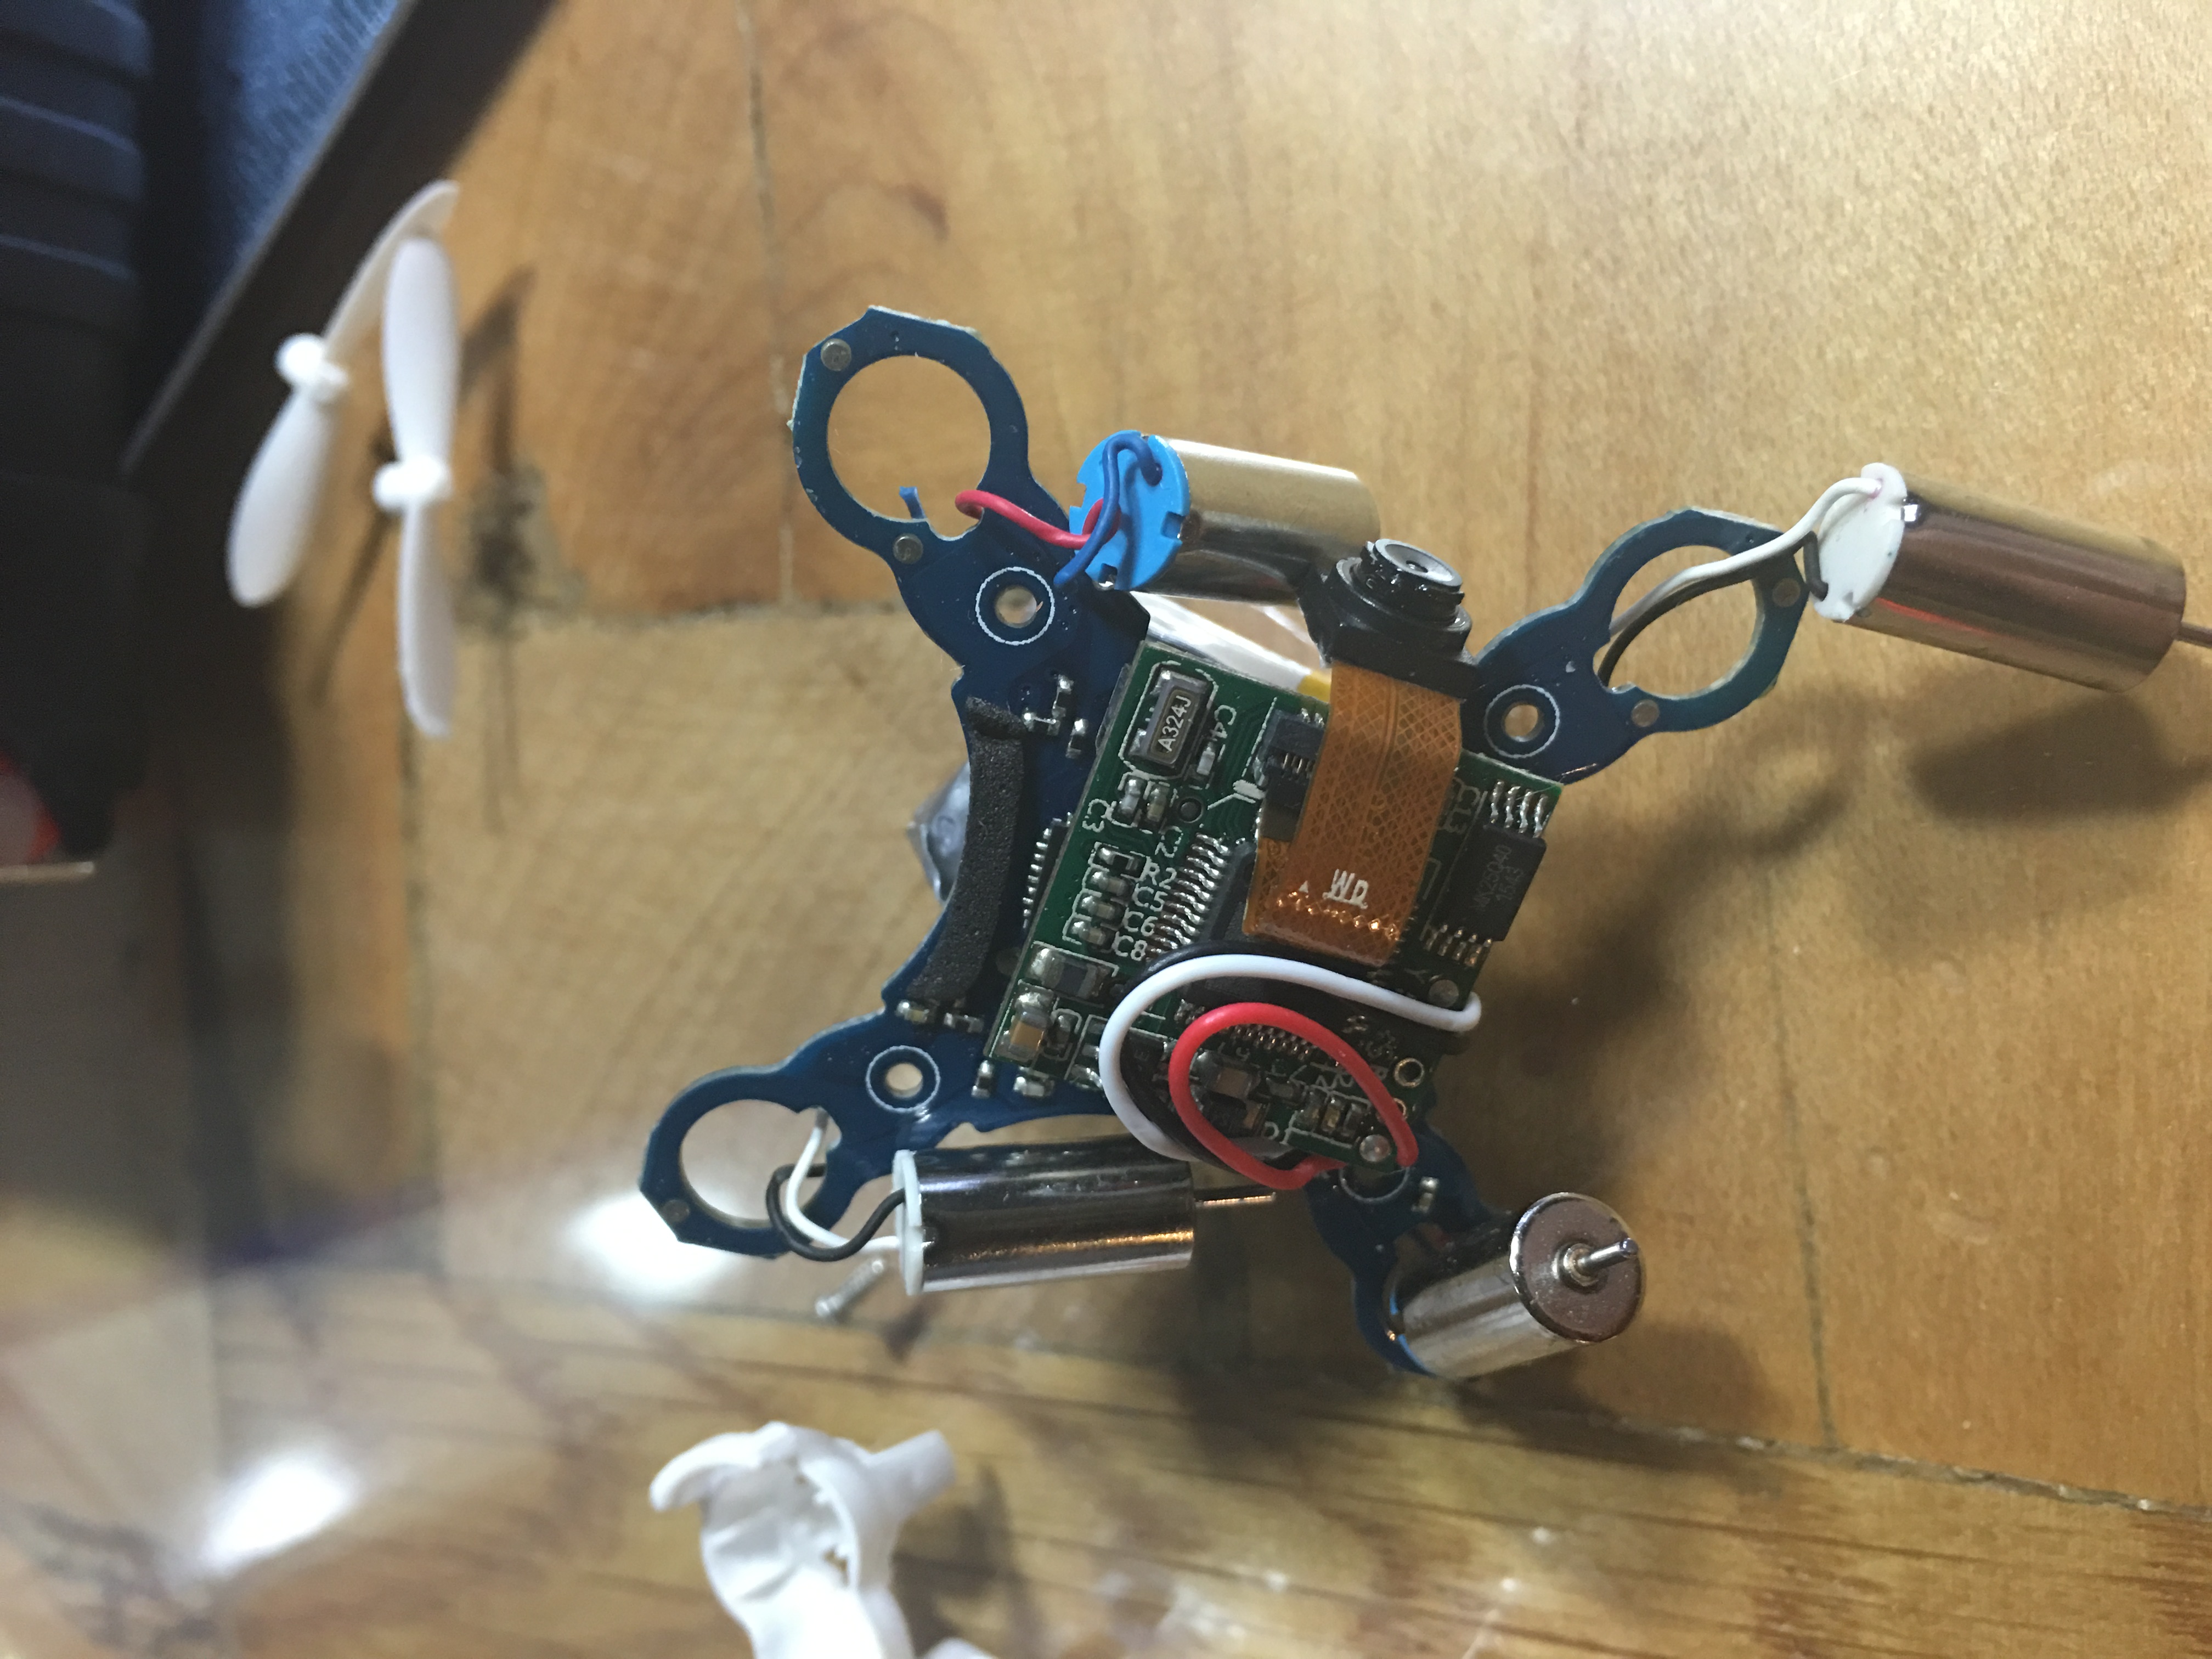
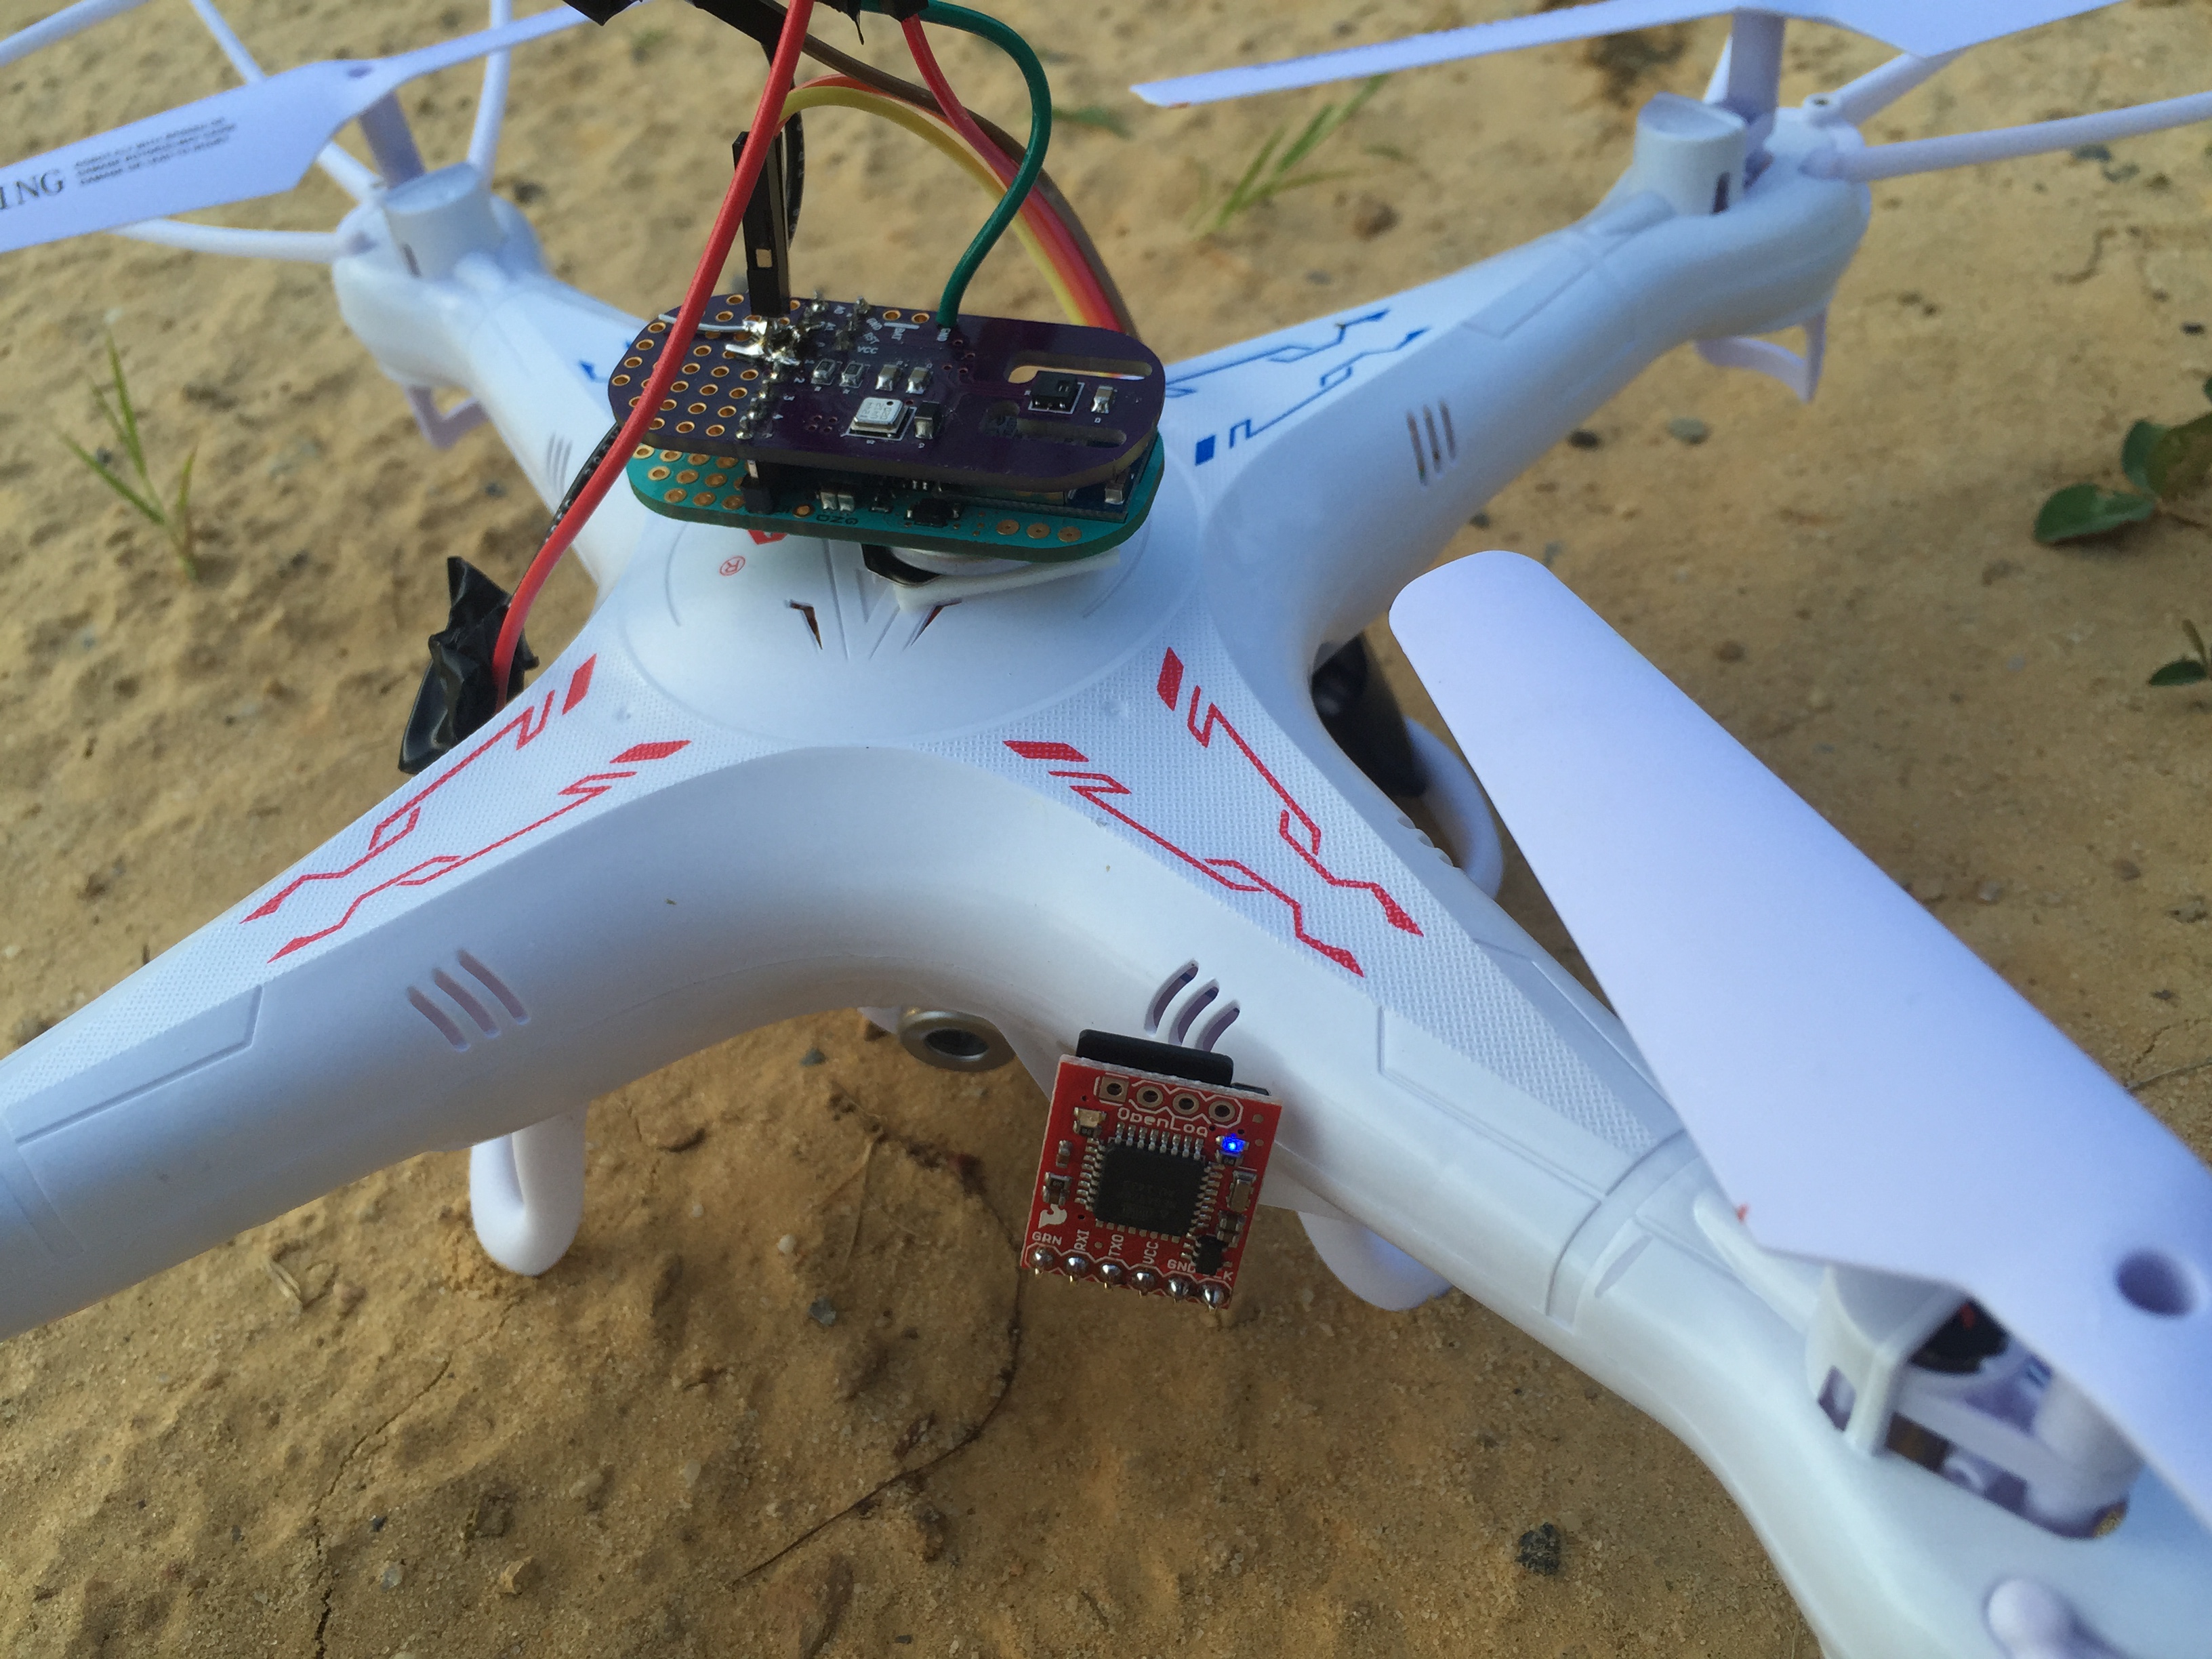
The problem was immediately obvious - the ground wire to the nonfunctional motor had been severed. Looking at a few other wires, it looks like they commonly get pinched in the enclosure during assembly. After repeated run-ins with objects, the wire was eventually sheared.

Note the broken blue wire in the upper right of the photo. Luckily this was an easy fix.

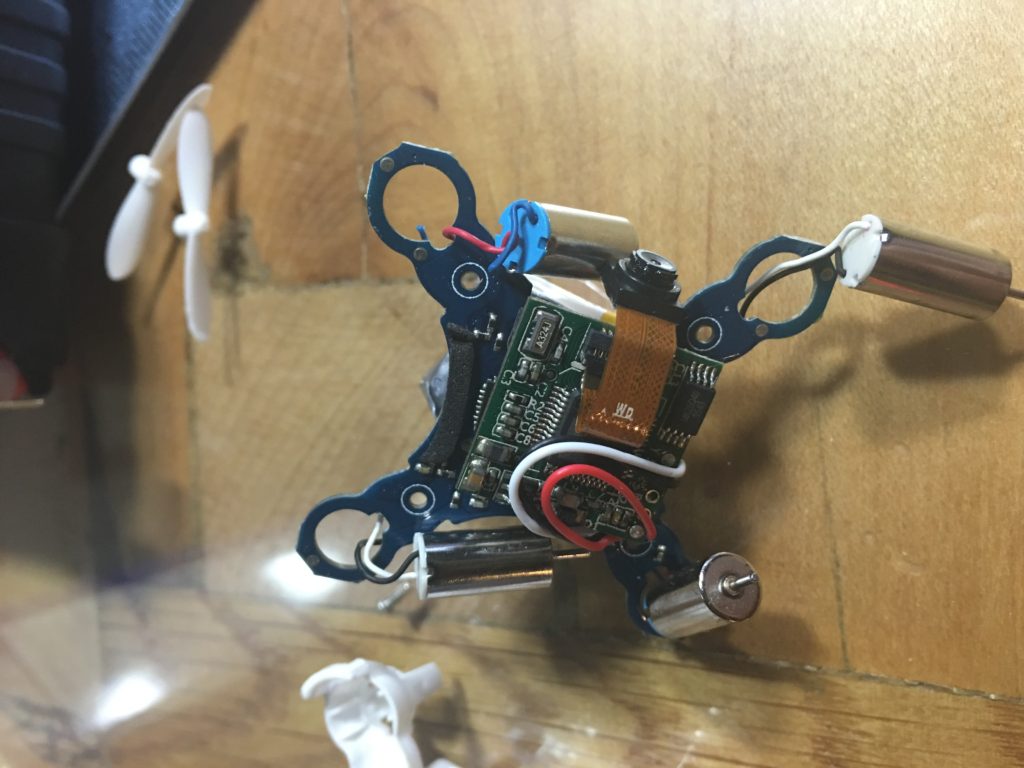
Note the broken blue wire in the upper left of the photo. Luckily this was an easy fix.

Using a little bit of magnet wire and a magnifier I was able to splice in a new section of wire. I was startled when the motor somehow jumped to life as the free end of the magnet wire swept across the PCB during the repair. I insulated it with a bit of electrical tape. The tape prevented me from inserting one of the four screws upon reassembly, but so far that doesn't seem to be a problem. Putting things back together took just a few minutes and I was happily flying again!

2016-04-16 19.42.51 copy

The moral of this story is that if you have one of these little quads and it seems to have died, go ahead and open it up! If the problem comes back, I may buy some extra motors or start a parts pool from other quads. Looking at the construction of the quad was a bit scary though - I think they will live in my LiPo fire safe now.

If you want to know more about how these little quads work, checkout these blog posts by Elecia White in her toy teardown series. Also, if you haven't listened to the podcast Elecia and Chris host "Embedded.fm" and you're reading this, you would probably enjoy it!

See you in a couple of weeks with a revisit of a popular myth we tested about a year ago!

Build a Drone!

cover_servo_May2016

Things have been a bit slow here at the blog with a lot of things happening at work and the fact that I'm not also very excited to be writing a monthly column about multi-rotors in Servo Magazine! Not to worry though, I've still got some excellent projects queued up for the blog, including one that has currently filled my living room with sawdust.

In this post, I wanted to share with you a video of the drone I scratch built flying around and encourage you to follow along and build it as well! The entire project cost about $350 and produced a really nice and versatile platform that I'm going to be adding instruments to, as well as GPS, telemetry, etc. The May issue of Servo featured the monthly column introduction on the cover! That column talks about FAA rules and how to get registered. The following columns are going to go through building the drone, step by step. We'll start off with the airframe, then move on to adding electronics, setting up the flight controller, and finally flying under manual and computer control. We already have other articles planned that include reviewing commercially available quads, as well as hardware hacking them for new functionality.  If you like the blog, you might like to follow that series of articles as well!

Drone Sounding Prototype

Again we have a short project post in-between the posts of the open science series (part 3 coming soon)! This time I want to share a fun little project involving cheap drones and an instrument pack that I designed on top of the Light Blue Bean module. The pack uses an HTU21D temperature/humidity sensor and a BME180 pressure sensor. I designed the board in the open-source PCB/EDA tool KiCAD. Should you want to reproduce the boards, the files to send off to a board house are available on a GitHub repository here.

I designed the pack to be a measurement device for a home, truck, or airplane of the weather enthusiast or storm chaser. Ideally it will send the data to a smartphone/tablet that then sends it out to the web or lets you do whatever you want with it. It was also a good excuse to play with the bean after hearing about it. While delivering another product to a friend, we decided to strap this sensor to a small and cheap ($33) drone and see what happened. We got some vague data, but the drone didn't get over a few meters high due to the high load. Zip ties provided some protection on takeoff/landing.

Our initial test flight with some quick plots in the background.

Our initial test flight with some quick plots in the background.

After playing we though it would be fun to do this on a drone with some more power. I grabbed a $55 drone (Syma X5C) on eBay and gave it a shot. After a couple of test flights I just couldn't get the bluetooth link to stay connected at the distances I wanted (50m).

My breakout and the bean attached to the top of the drone body.

My breakout and the bean attached to the top of the drone body.

I added a kludge that wrote data to an SD card using the OpenLog. It was extra weight since I needed two more coin cell batteries, but the drone turned out to be able to carry it to 45 m once or twice. Then the drone looses signal and shakily falls out of the sky until I can get control again. While inspiring me to drool over more advanced drones, I did get some interesting data! Some of the plots are rather small in web-view, but click on them to expand. I just didn't want a bunch of individual figures making the post scroll forever.

2015-07-27 19.17.44

First I'll show my first SD logged flight(s). Below is the altitude plot (derived from the barometric pressure sensor on-board).

A few up/down flights of the drone. The ascent in the grey box will be examined in detail.

A few up/down flights of the drone. The ascent in the grey box will be examined in detail.

If we take the highest and most constant climb rate ascent (gray box) and look at the temperature/dewpoint data we see rather clean results!

flight1

It was a dead still evening, just before sundown. Without any mechanical mixing,  we see radiation from the ground producing a temperature inversion (temperature increases with height here). We also see a nice dew point trend to drier air as we ascend. For fun, I calculated the lapse rate. This just means how fast the temperature changes with height. Plotting the data and fitting a line we get about +11 degrees/kilometer of height. A reasonable number. (Perhaps coincidentally about the negative of the typical dry adiabatic lapse rate? It's been too long and I didn't ever do much near ground meteorology. Thoughts appreciated.)

lapse_rate

The next evening, a very similar setup without wind, I did another sounding that got up to 45 meters. On this flight I noticed that the bumps in the temperature and dew point trends match rather well with the bump in my ascent rate. Since this drone isn't programmable, I do this by hand which is tricky to judge. It probably has to do with the sensors needing a lot of settling time to equilibrate to their surroundings (a couple of seconds). Maybe flying small circles on the way up is a solution. I also have the video from this flight if you're curious what it looks like. Nothing too interesting, but the uncontrolled descents are rather exciting. I've read about hacking better antennas on this drone for more range, so that's a thought. Before I get it much further away I want to do it in a large field to decrease the risk from a runaway drone. If this proves to be interesting enough, maybe a drone update will be in order. They are pricey though!


Flight 2 data

Flight 2 data