
UPDATE: John Meacham commented below letting us know that he has updated the package. It can now be installed with it's new features by installing the packages I mention below and then:
>> sudo apt-get install libfile-slurp-perl
>> apt-get install darcs
>> darcs get http://repetae.net/repos/clabel
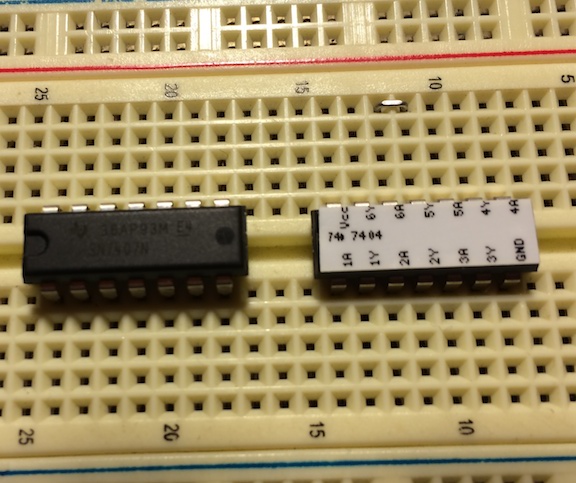
This is a topic of interest to a rather limited group, but one well worth posting I believe. Those who build electronic circuits regularly know the pain of constantly swapping back and forth between datasheets when trying to remember which pin of an integrated circuit does what. It's different for almost every chip and can slow down prototyping when you're on the fly or don't have internet access. John Meacham over at Not A Number decided to remedy this problem after noticing that 6mm tape from a Brother label printer fit perfectly on top of his chips!
You can find his Perl script over here, but I wanted to elaborate on how to get it working and my experience with it thus far. I ended up running the code on an Ubuntu virtual machine with Parallels. I had lots of problems getting the libraries needed to run on Mac OSX, but the Linux install took just a few minutes.
First, download and unzip the files from John's website. There is a read-me telling you how to run the scripts, but we don't get there just yet. First we must install the GD module for pearl and the cups-bsd for printing utilities. To do so, follow these two commands:
>> sudo apt-get install libgd-gd2-perl
>> sudo apt-get install cups-bsd
Since we're going to make our own custom labels as well, we'll need two more packages. The barcode and YAML packs. Just run:
>> sudo apt-get install libconfig-yaml-perl
>> sudo apt-get install libgd-barcode-perl
Okay, now we need to install our printer. Just plug in your Brother printer and follow the normal steps to install it just like any other device. Ubuntu automatically found the drivers for me and set it up.
Next I just printed out a 555 timer IC label to get started. My printer is called labelprinter, so the command was:
>>./print_png.prl -Plabelprinter -w 6 out/555.png
The label printed out! Now I did notice that sometimes there is some garbage at the beginning of the label, but I trimmed that off with scissors anyway. I do wish there was a way to prevent the printer from feeding and cutting after every label though, it wastes some label tape. There may be a way to modify the scripts.
While there are a few included labels, you'll want to make your own eventually. This is done with YAML. Let's make a label for the 74LVC244A octal buffer/driver. First we'll look at the datasheet (here) and get the pinout. Below is the screen-shot of the datasheet spec.
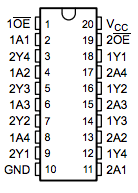
We must write a YAML file to describe this pinout:
74hc165:
name: 74hc165 - PISO register
pins:
- /PL
- CP
- D4
- D5
- D6
- D7
- /Q7
- GND
- Q7
- DS
- D0
- D1
- D2
- D3
- /CE
- Vcc
The / before the pin will add the overbar to indicate the active state of the pin. The YAML code is added to the file chips.yaml and we run the script:
>> ./chip_label.prl -c 74LVC244A
We now have a new label to print and affix to our chips! ![]()
There we go! Sorry this was a bit lengthy and technical, but this tool is incredibly useful for anyone involved with prototyping!
4 responses to “Never Confuse Chip Pinouts Again!”